DIY Rain Barrel
Learn how to decorate a rain barrel to have a faux wood look and blend into your garden using the HomeRight Quick Finish paint sprayer.
If you love to garden or are looking to be self-sufficient, one of the easiest things you can add to your garden or home is a rain barrel. There’s no need to purchase the high-end ones, rather you can add one for less than half the cost. I’m here to show you my DIY rain barrel and show you how to dress it up with a fun faux wood look.
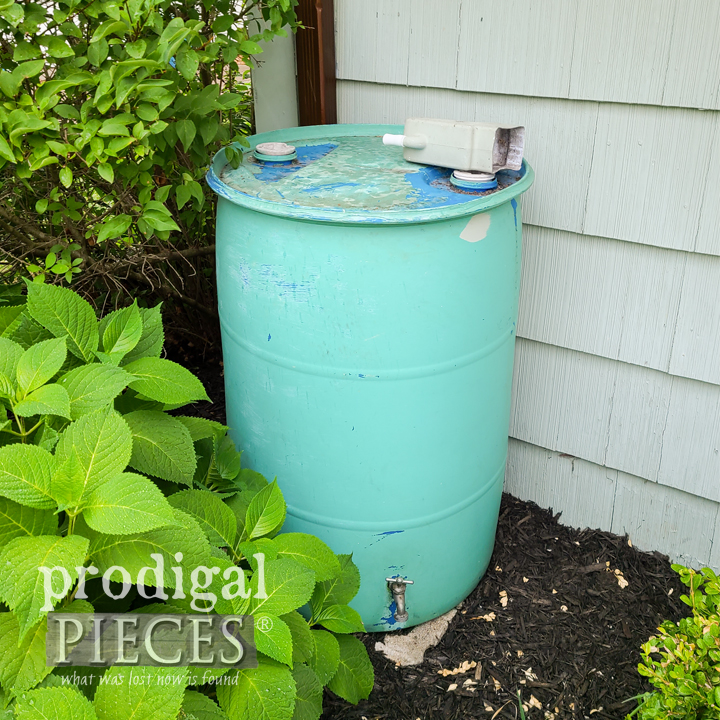
First, take a look at my rain barrel in the “before” state. It’s not horrible, but definitely has seen some love in the last 7 years. When we added our DIY raised garden beds to our front lawn, many folks looked at us as if we were crazy when we were starting. However, they now sing a different tune.
At that same time we also added this rain barrel and have enjoyed it ever since. We bought a food-grade 55 gallon drum and this rain diverter kit and had it set up in no time. I used some extra green paint I had laying around to sort of camouflage it, but now it’s faded and peeling (or picked off by my kids…tsk).
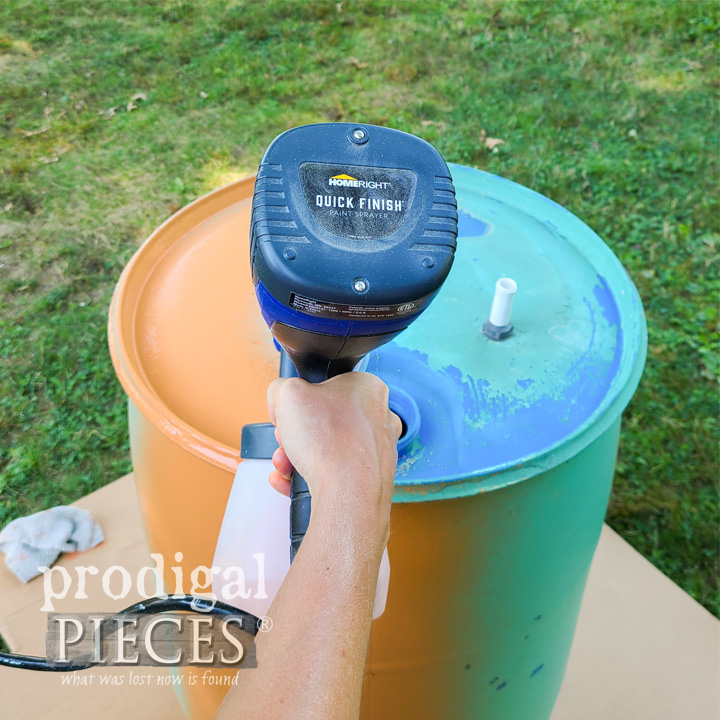
It’s time to pull it out, clean it up, and make it look brand new. First, I give it a good washing with soap and water and let dry. Then, I remove any paint chipping and get it ready for paint. Once I have that complete, it’s time to bring out my HomeRight Quick Finish Paint Sprayer. I fill the canister with an outdoor paint, thin it per manufacturer instructions, and have at it.
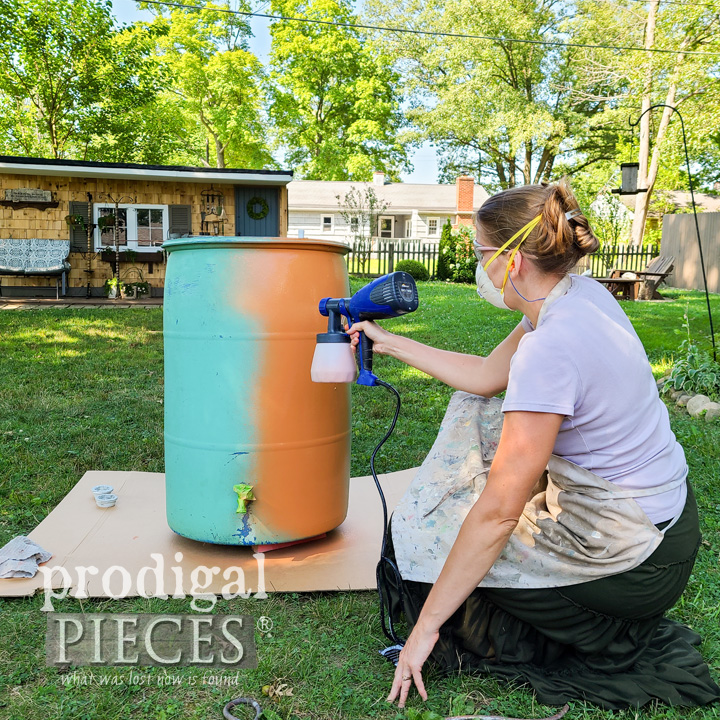
This handy sprayer really does the job well and quickly. Just a note, take a minute before you start spraying your project to make sure you have the flow settings as you like and get the hang of spraying. Use a piece of scrap wood or cardboard – begin by spraying before you hit the surface and continue off for nice, even coats. Also, use your elbow to flow evening, not bending at the wrist. Last, I let the first coat cure for about 2 hours. Then, I add a second coat, letting that cure as well.
In addition to the Quick Finish being easy to spray, it’s also quick in the cleanup. The Quick Connect feature allows you to remove the nozzle and canister with a simple twist. That makes cleanup a breeze. You can see it in action in my video HERE.

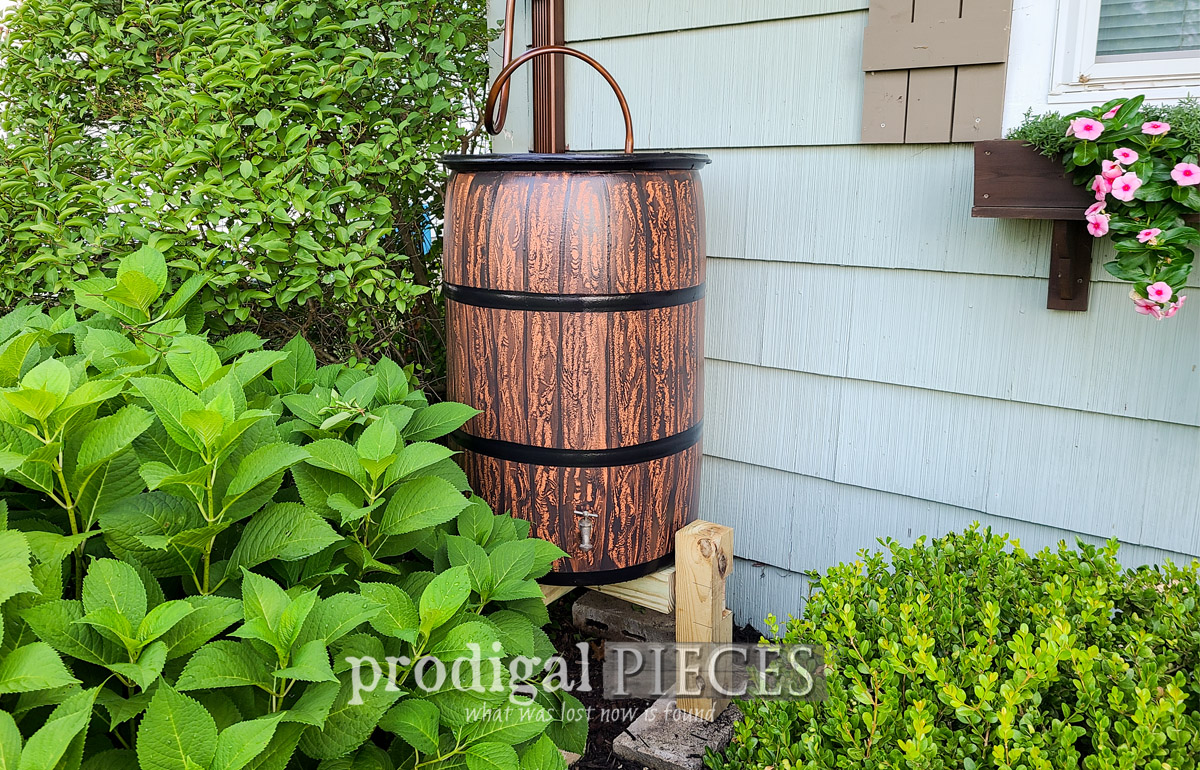
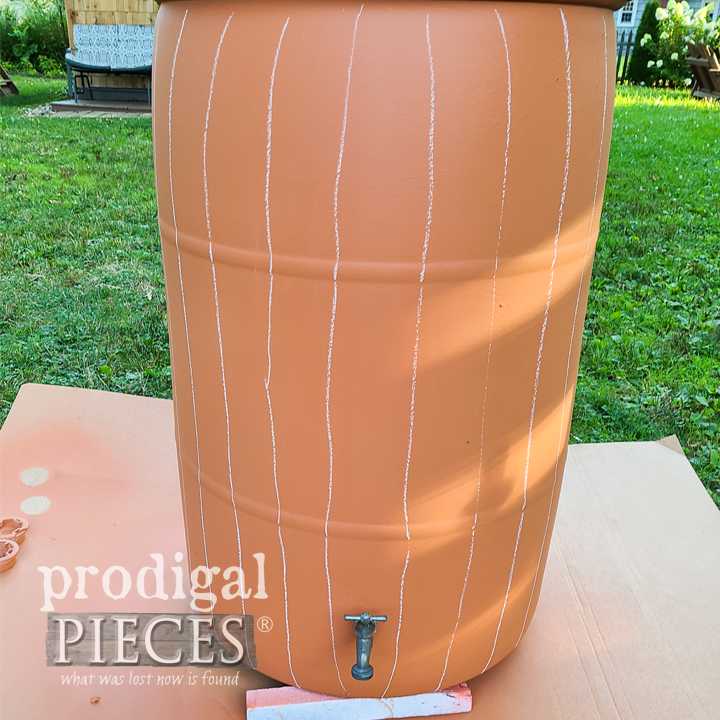
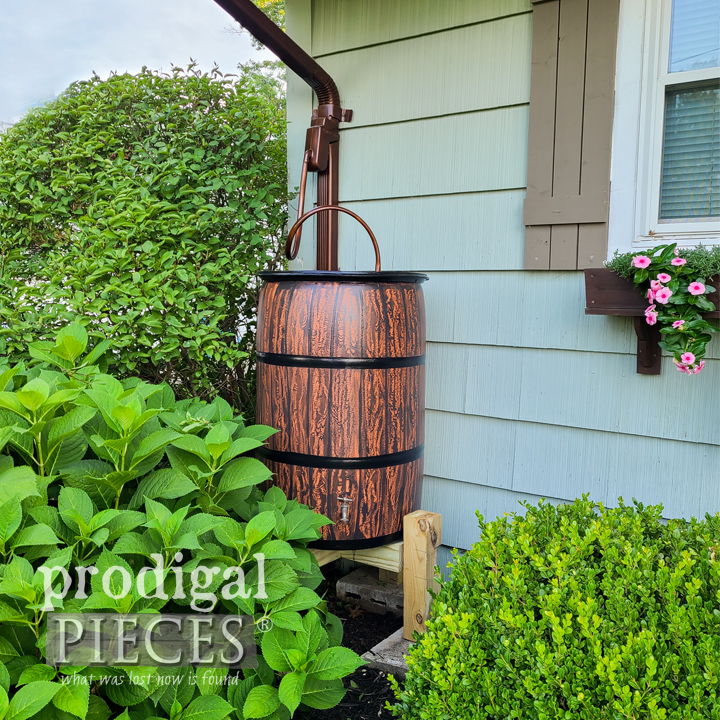
At this point, you can stop if you just want a solid colored rain barrel. For me, however, I wanted to take it up a notch. My rain barrel sits in front of my house, so I want to add a bit of charm to it. For the summer it is mostly hidden by my landscaping, but for all the winter months it is exposed. You’ll notice I painted the base coat in a color called, Maple Glaze. That is because I’m after a wood grain effect. To start this part of the makeover, I use a piece of chalk to draw on my lines. Notice I make the lines bowed towards the center to give a rounded effect.
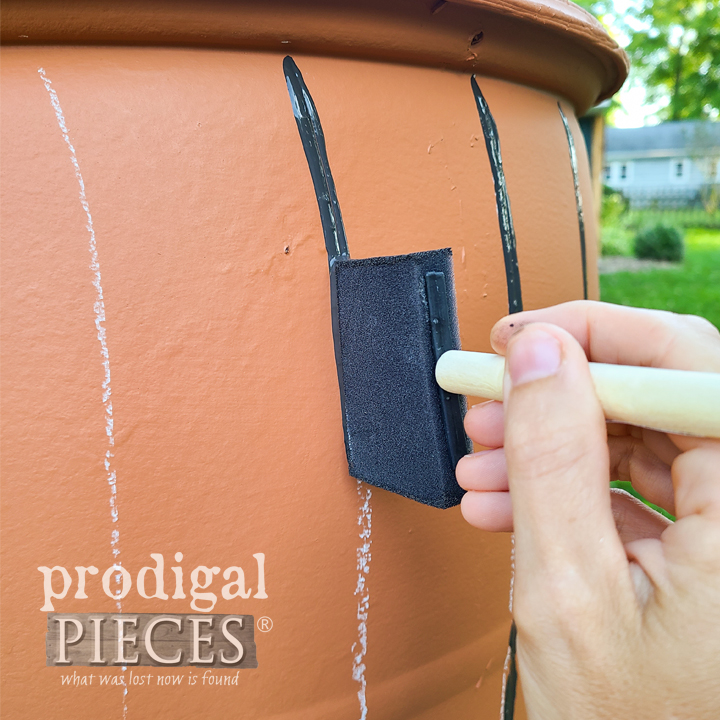
Once I have my chalk lines as I like, I use a foam brush and a dark grey paint to make the lines. I’m not too particular at how straight they are, but the idea is to get the general look of barrel staves. Also, I do make lines across the top to look like a barrel lid.
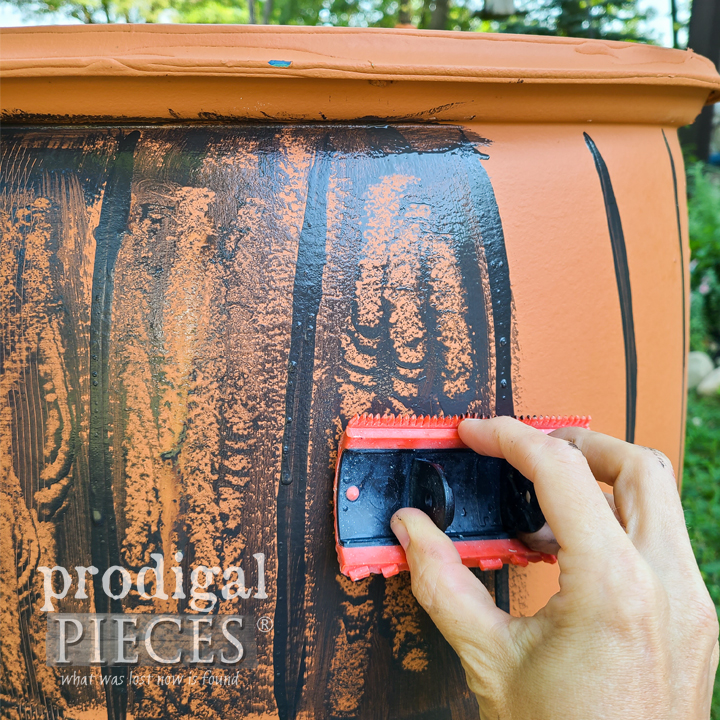
After those lines cure for an hour or so, it’s time to add our faux wood grain. I have used this wood graining tool set (https://amzn.to/3ahgyxc ) soooo many times and love it. The basic jist of it is to brush on a light layer of paint, use the tool to rock back and forth over that path to create a unique grain pattern. Because the drum has a rounded surface, you’ll need to make many passes. It only took me about 15 minutes to do the whole barrel. You can see the tool in action in my post HERE.This is definitely a fun part where you can play with it – don’t be afraid because there are no wrong ways to do this.
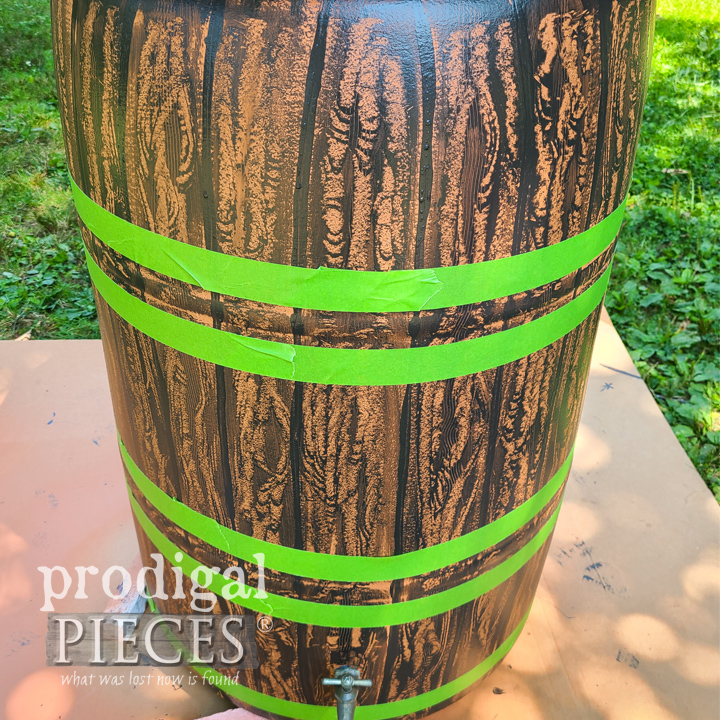
Last, but not least, we will be adding our barrel rings. On my drum, you can see the raised bits where we can add the rings. If your barrel doesn’t have those rings, you can add them. Just measure and make your rings where you see fit to add them. For my rings, I wanted to make them a bit wider, so I aimed for a 1 ¼” width.
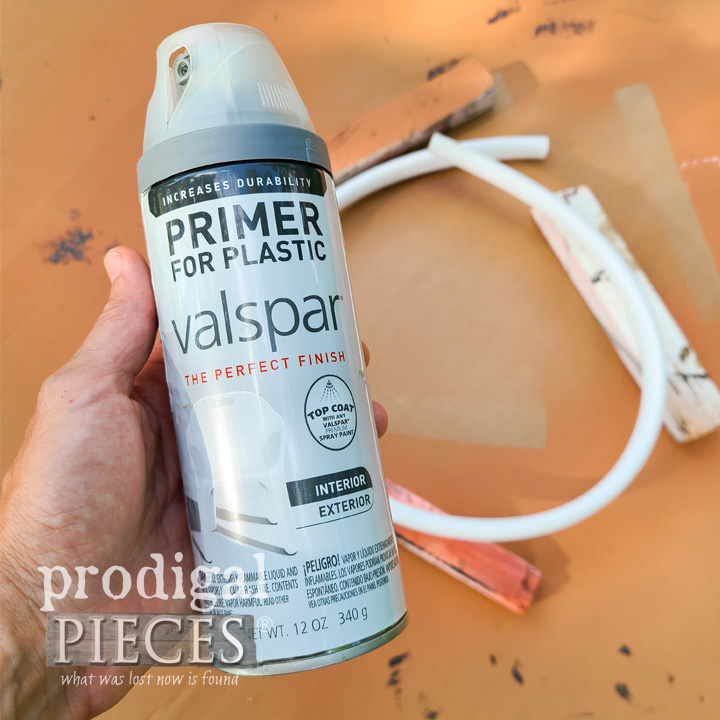
Now that your painting is done, it’s time to assemble. Since my barrel was already set up, I just hooked mine up. However, if you’re starting off new, just follow the instructions that come with your diverter set. Simply put, you just cut the downspout, insert the diverter, add your plugs and taps, and you’re good to go. If you’re like me, I want my stuff to match, so I painted my diverter the same color I painted my downspouts. A great way to do that is use this plastic primer before applying the paint.
Here’s my updated DIY rain barrel complete and setup ready to go for my garden. I’m lovin’ it! It’s a huge improvement over my chippy green one. Plus, it adds value to my curbside appeal. Just make sure you are allowed water collection in your area. And, these are easy to close up for winter with the kit provisions.

I had to giggle because if I painted it differently it could even pass as a still. haha. I love DIY and all the many facets you can create to make your own home story. I’ve said it before, you can do this too and you can inspire others. I invite you to come see my other DIY projects from furniture, to remodeling, sewing, crafting and even my online shop at Prodigal Pieces. Until next time!
Download project steps & shopping list
We'll never share your email with anyone else.